Thinking of diving into Facebook ads? Wondering what the common pitfalls are?
In this article, you’ll discover three important considerations when starting your first Facebook ad campaign.
#1: Commit to a Facebook Funnel Implementation
All successful marketing starts with a clear strategy and Facebook advertising is no exception. With a strategy built around your available audience assets, you can execute campaigns that will deliver the best results for your business in the fastest time.
You want to implement a Facebook advertising strategy that moves someone from a stranger to a paying customer through a series of ad campaigns, known as a Facebook ad funnel.
There are three stages to a successful Facebook ad funnel:
- Awareness: At the top of the ad funnel, the goal is to generate awareness of your business. In doing so, you’re also building recognition in the Facebook news feed, which is important later in the funnel, as well as for your business’s credibility and authority.
- Engagement remarketing: For this stage, the goal is to build consideration of your products or services in the minds of your target audience. You’re driving people from Facebook to your website to find out more and purchase.
- Website remarketing: The goal at this stage is to drive sales and leads by engaging people who have visited your website.
For a full breakdown of each stage of the Facebook ad funnel, click here.
You always want to start the funnel implementation at the awareness stage because these campaigns target cold audiences of new people and don’t use existing audiences.
Whether you implement the other two funnel stages—engagement and website remarketing—will depend on your answers to the following two questions:
- Do you have Facebook pixeled website traffic?
- Do you have other existing engaged audiences? These are engagement-based custom audiences that include video viewers and Facebook page engagers.
If you answered yes to both questions (meaning you have pixeled website traffic and other existing engaged audiences), you can start with all three campaigns: awareness, engagement remarketing, and website remarketing.
If you answered yes to the first question (you have pixeled website traffic) but no to the second question (you don’t have other existing engaged audiences), you can launch both awareness and website remarketing campaigns at the same time.
If you answered no to the first question (you don’t have pixeled website traffic) but yes to the second question (you have other existing engaged audiences), you can start with awareness and engagement remarketing.
If you answered no to both questions (you don’t have any pixeled website traffic or existing engaged audiences), you have to start from scratch. Here’s how:
- Start with the awareness stage.
- Once you have enough engaged audiences, implement engagement remarketing, which drives people to your website.
- Once you have enough website traffic, implement website remarketing.
#2: Set Up and/or Optimize Your Facebook Pixel Settings
The work you do researching and setting up new Facebook ad campaigns can be worthless if you aren’t tracking the results and then optimizing your campaigns. If you don’t install the Facebook pixel and conversion events, you won’t know if your campaigns are delivering the desired results and you won’t be able to measure your return on ad spend (ROAS).
So once you’ve decided on your Facebook ads strategy, set up your Facebook pixel and conversion tracking and/or turn on advanced pixel settings.
Install the Pixel and Conversion Events
There are two parts to tracking on Facebook. The first part is the Facebook pixel, which is a piece of code that you install across your whole website. It allows you to build website custom audiences so you can target your website visitors with Facebook ads.
![]()
The second part is conversion events, also known as standard events. These are specific actions that someone takes on your website that you can track and attribute to your ad campaigns. These actions include product page views, add to cart, initiate checkout, purchases, and leads. To install the Facebook pixel and conversion events, click here for a full walkthrough or watch this video.
Turn on Advanced Facebook Pixel Settings
Once you’ve installed the pixel and event tracking, ensure the following advanced settings are turned on. These are small details that can make a big difference in your pixel’s effectiveness.
Start by navigating to your Events Manager.
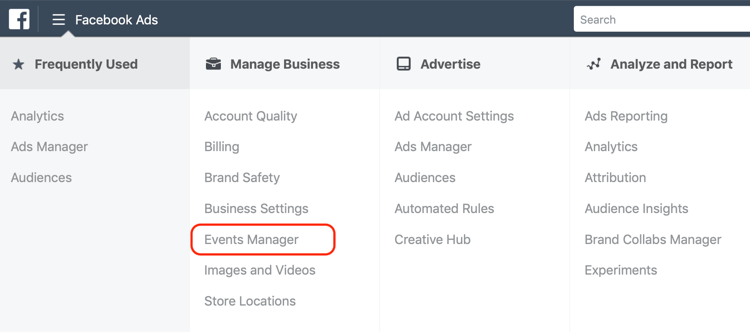
From the drop-down icon list, select Settings.
![]()
The first setting relates to cookie usage. If it’s set to third-party, change it to first-party. By doing this, your pixel will be implemented on your website and read by browsers as main code, not third-party, so it won’t be excluded from your site.
Also check that automatic advanced matching is turned on. This is the second advanced pixel option you need to turn on. Automatic advanced matching tracks additional pixel data known as microdata so you’ll see a higher attribution and match rate for event actions and website custom audience sizes.
#3: Create Target Audiences
Before you set up any Facebook ad campaigns highlighted in your strategy implementation, you need to create the audiences you’re going to target.
Understand Audience Temperatures
Audiences on Facebook fall into one of three categories: cold, warm, or hot. These are also known as audience temperatures. Each temperature correlates with different audience types, as well as a stage in your Facebook ad funnel.
First up are cold audiences, which contain people who don’t know you and have yet to be exposed to your business. Cold audiences are incredibly important because they’re the foundation of sustainable Facebook advertising and the starting point for the majority of people who will become your customers from your ad campaigns.
Cold audiences are the largest of the three audience temperatures and include both saved audiences and lookalike audiences.
Warm audiences are next. They contain people who have previously engaged with your business on a Facebook-owned property, whether that interaction came via organic or paid content. Warm audiences are Facebook custom audiences, excluding website.
Finally, we have hot audiences. These audiences are comprised of people who have visited your website previously and are familiar with your business but haven’t yet converted into customers or clients. You create hot audiences by using the website custom audience feature.
Create Your Saved, Lookalike, and Custom Audiences
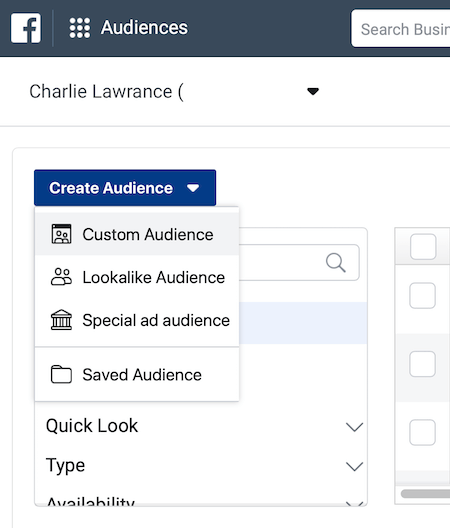
For all of the Facebook ad strategies mentioned earlier, you want to create your cold audiences. These include saved audiences and lookalike audiences.
Before you can create your lookalike audiences, you need to create the source audiences upon which your lookalike audiences will be built. Facebook lets you choose from nine different custom audience types to create your source audiences. You want to choose the one that will deliver the best results, and that depends on what marketing assets you have in your business.
To visualize this, if you have a large database of customers, create a customer list custom audience and use that as your source audience. This will deliver the highest-quality lookalike because you’re essentially cloning your customers. For a walkthrough of how to create this lookalike audience, click here.
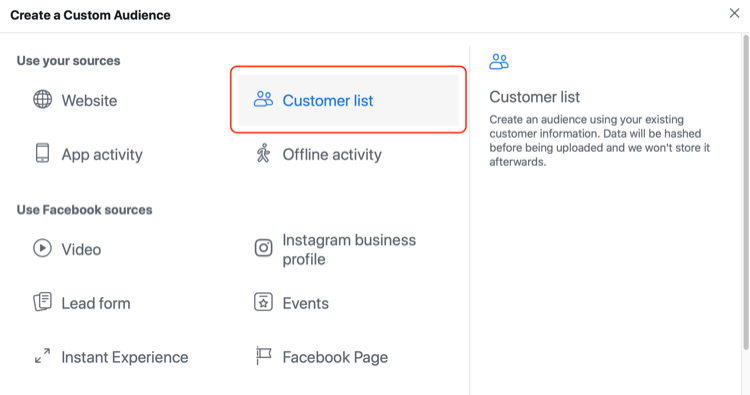
By creating the source audiences for your lookalike audiences, you’ll have also created some of your warm and hot audiences such as page engagement custom audiences and website custom audiences.
Now finish creating the rest of your warm and hot audiences, which you’ll use in your engagement and website remarketing campaigns.
For a detailed guide on how to create website custom audiences, click here and for one on how to create the other types of custom audiences, click here.
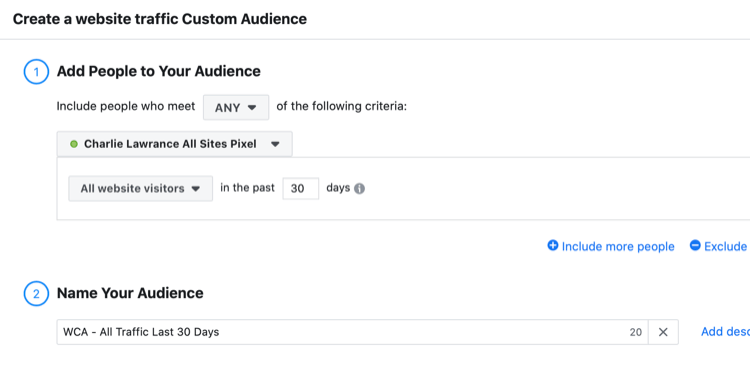
Pro Tip: With website custom audiences, start with an audience of all traffic in the last 180 days. Then create audiences for 90, 60, 30, 14, 10, and 3 days. Although you might only have enough people to run a campaign to the 180-day audience at the moment, when you start driving people to your website, the audience size of the other durations will start to increase. Eventually, you’ll be able to test the other audience durations for effectiveness.
Tips to Successfully Promote Your Product or Service With Facebook Ads
Another point to consider before launching your Facebook campaigns is what products or services you want to promote and the offers you want to use. Offers are the best way to entice new potential customers to convert to buyers. The offer you promote will depend on what you sell.
For instance, if your business sells a product online—either physical or intangible—you want to use discounts. Discounts are simple but effective. You’ve almost certainly seen an ad in your news feed that says something like, “Get 10% off when you use promo code FB10 at checkout.”
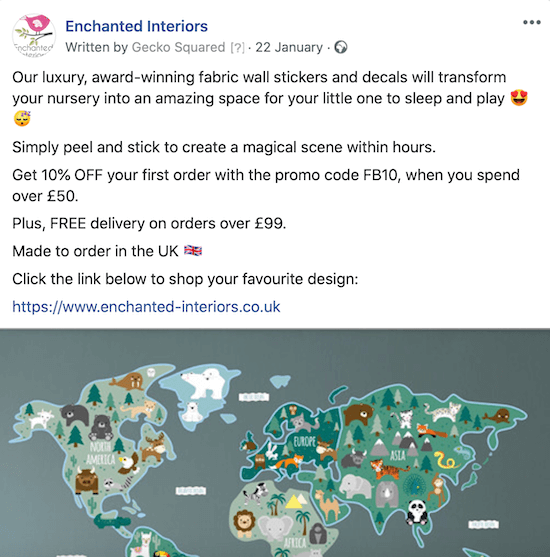
For new customer acquisition, discounts reduce the financial barrier to entry for your target audience to purchase, minimizing the level of risk associated with purchasing from a new company they haven’t used before.
Pro Tip: When deciding what discount is right for your product, go with the highest possible one you can afford and calculate it with the repeat purchase rate and lifetime customer value in mind, not just the value of the customer’s first purchase.
For service-based businesses, a super-effective offer to get your potential customers either into the store or on the phone is a “free consultation.”
Free consultations work exceptionally well for service providers with a high average client value (ACV) of thousands of dollars. The high ACV means you can front-load your acquisition time by providing the consultation for free because when someone converts into a client, the cost is more than recovered. Clients will spend thousands of dollars in the immediate purchase of a service or over their lifetime as a customer.
Once you know the product or service and offer you’re promoting, move to choosing your ad creative, otherwise known as the images or videos you use in your ads. This is the part of the ad that will grab your target audience’s attention in the news feed and get them to stop scrolling and consume the rest of your ad.
No one type of content performs best so you want to use a mix of eye-catching images and video.
Pro Tip: When it comes to choosing product photos to use in your ad campaigns, I’ve found the most successful advertisers use branded lifestyle product photos, as in the example below. Basic product photos on a plain white background don’t cut it anymore.

When you use a mix of images and videos, you’ll be using different ad formats as well. To illustrate, you could create three variations of an ad with different creative: one version of a single image ad, one version of a video ad, and then one version using the carousel ad format.
For videos, keep them short, ideally shorter than 1 minute. If the videos just show your product and aren’t demo- or explainer-style, cut them down to 15–30 seconds.
Conclusion
Facebook has the most advanced targeting capabilities and versatile ad formats of any advertising platform. For these reasons, there are now more than 7 million global advertisers, competition is intense, and ad costs continue to increase year over year.
Anyone can set up Facebook ads in a few minutes by using the Boost functionality so there’s little or no barrier to entry. However, this means that new advertisers can easily jump on the platform, run Boost posts or full ad campaigns with very little knowledge, and find themselves quickly losing money due to mistakes with their campaigns.
So before you set your next campaign live, follow the steps above to put yourself in the best position to see great results from your Facebook advertising.
What do you think? Do you have any other important considerations to add to this list for new Facebook advertisers? Share your thoughts in the comments below.
