Want more sales from your Facebook and Instagram marketing? Have you considered retargeting people who already engage with you?
In this article, you’ll learn how to create a Facebook and Instagram ad campaign to target people who have engaged with your Facebook and Instagram content.
Why Engagement Remarketing Ad Campaigns Work
Before diving into how to create this type of campaign, you need to understand where this campaign type exists in your ad funnel.
There are three stages to a successful Facebook ad funnel: awareness (level 1), engagement remarketing (level 2), and website remarketing (level 3). This framework allows you to move someone from a stranger to a paying customer by showing the right ads to the right people at the right time.
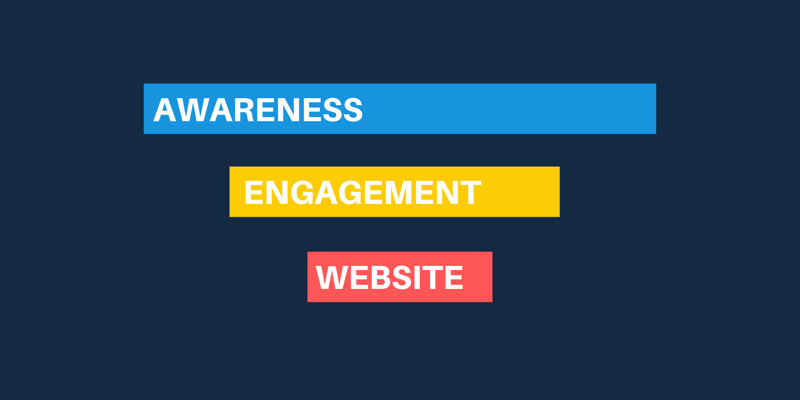
The campaign type you’ll be setting up is part of the engagement remarketing stage and sits alongside a video remarketing campaign that targets people who have watched the video content you position at the awareness stage of the ad funnel.
This engagement remarketing (level 2) campaign targets “warm” audiences of people who have engaged with your business on Facebook or Instagram and involves creating page and profile custom audiences.
By targeting warm engagement audiences, you’ll see higher engagement and conversion rates. You’re capitalizing on the fact that your audience already knows your business because they’ve interacted with your organic posts or other ads.
#1: Create Custom Audiences From Engagement With Your Facebook Page and Instagram Business Profile
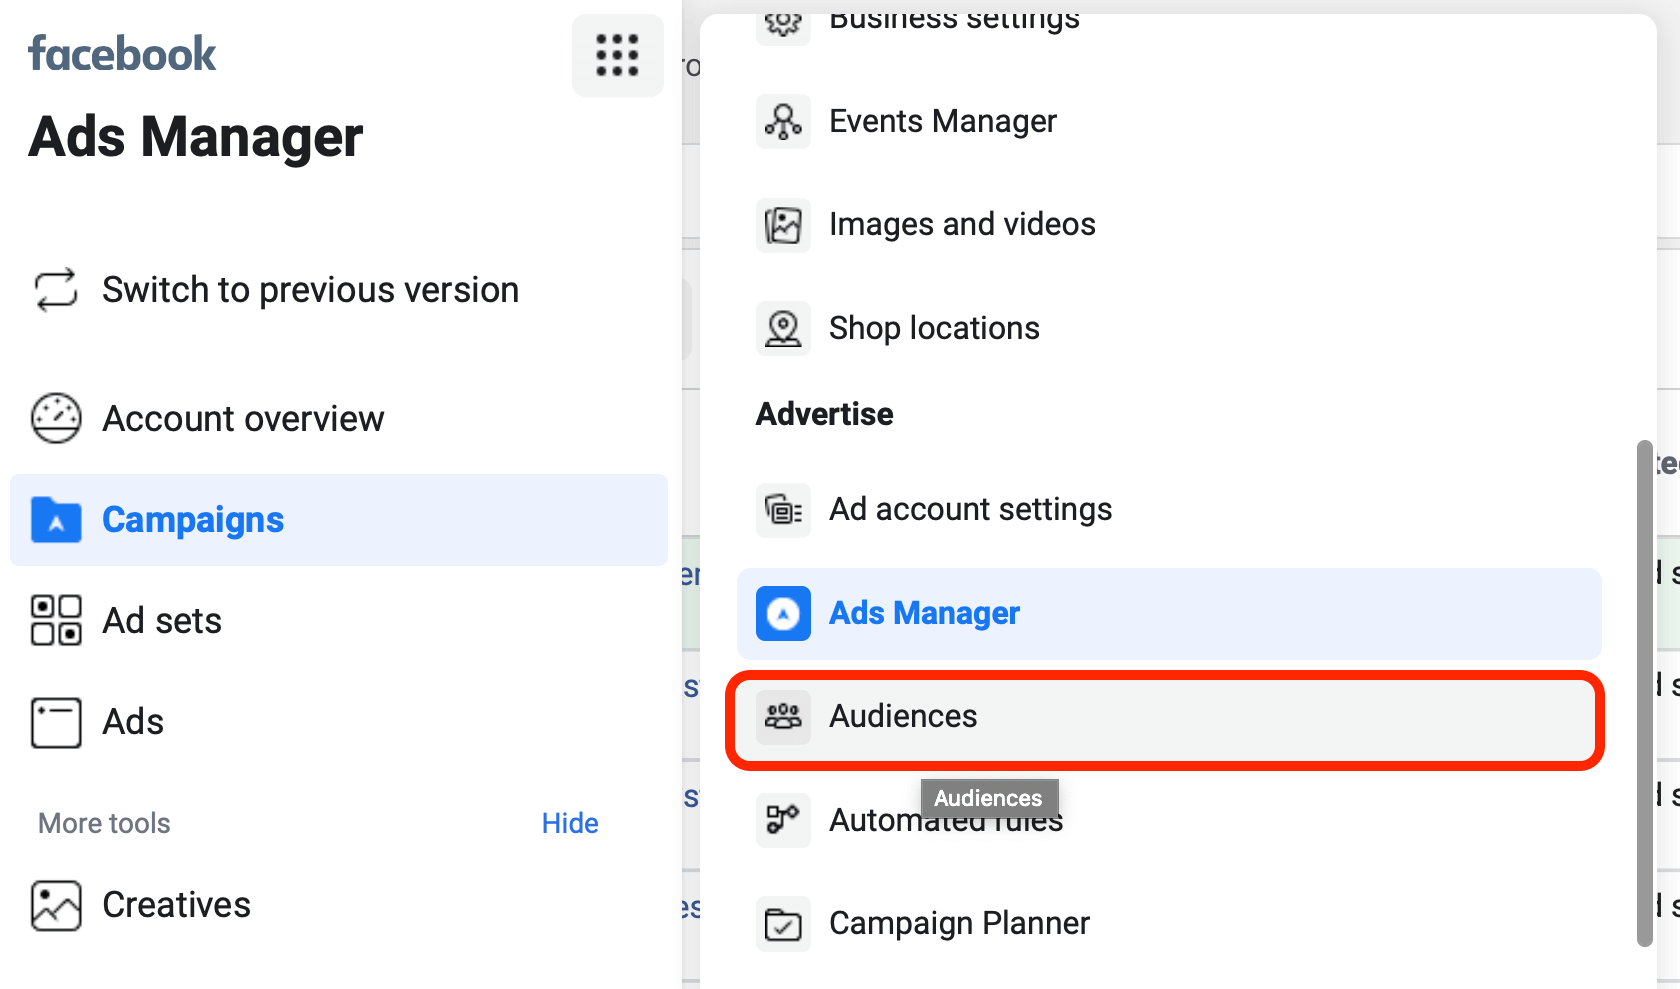
Before creating your engagement remarketing campaign, start by creating your custom audiences. To do this, click on the main menu in Ads Manager and select Audiences from the pop-out menu.
When the Audiences dashboard appears, click on Create Audience and then select Custom Audience from the drop-down menu.
This opens the Create a Custom Audience window where you’ll see options you can use to target ads to people who have engaged with your business either on Facebook-owned properties or on your website.
Under Use Facebook Sources, select the Facebook Page option.
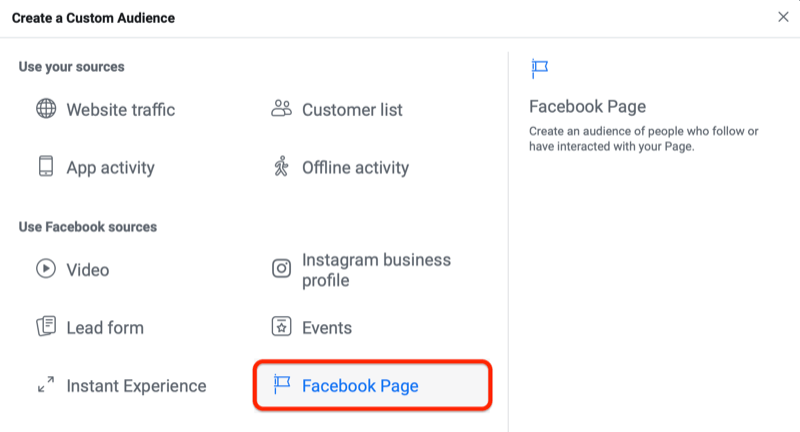
The Facebook page engagement creation window opens next.
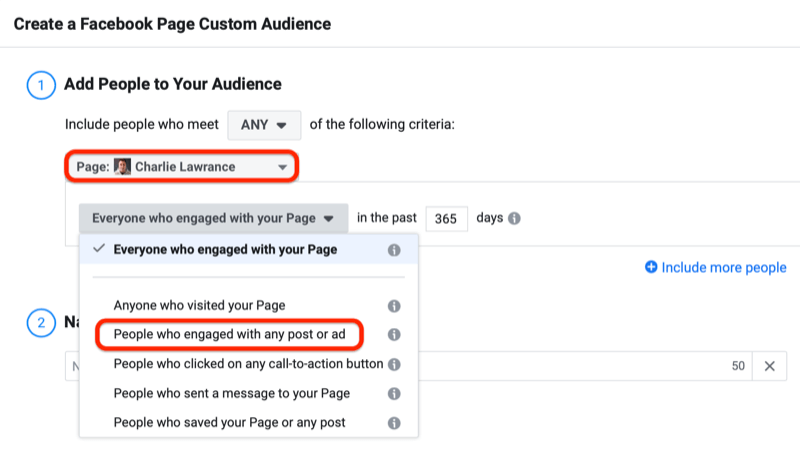
In the Add People to Your Audience section, select your Facebook page. Then move to the engagement condition field where you’ll find six options:
- Everyone Who Engaged With Your Page
- People Who Visited Your Page
- People Who Engaged With Any Post or Ad
- People Who Clicked on Any Call-to-Action Button on Your Page
- People Who Sent a Message to Your Page
- People Who Saved Your Page or Any Post
Select People Who Engaged With Any Post or Ad. With this condition, the audience will include people who have engaged with a Facebook page post or ad. This includes reactions (Like, Love, Haha, Wow, Sad, Angry), shares, comments, link clicks, and carousel swipes.
Next, set your audience duration, which is the number of days that people will remain in your audience after they engage with your ad or post. People will be removed from this audience after the set time unless they engage with your ads or organic posts again. You can set a maximum duration of 365 days, but here you want to start with 180 days.
You’ll be creating multiple engagement custom audiences so using a set naming convention will make it easier to manage them. To visualize this, you might use a name like “PEA – Facebook Ad Engagement – Last 180 Days.” In this case, “PEA” stands for page engagement audience, “Facebook Ad Engagement” tells you the platform and engagement condition, and “Last 180 Days” shows the audience duration.
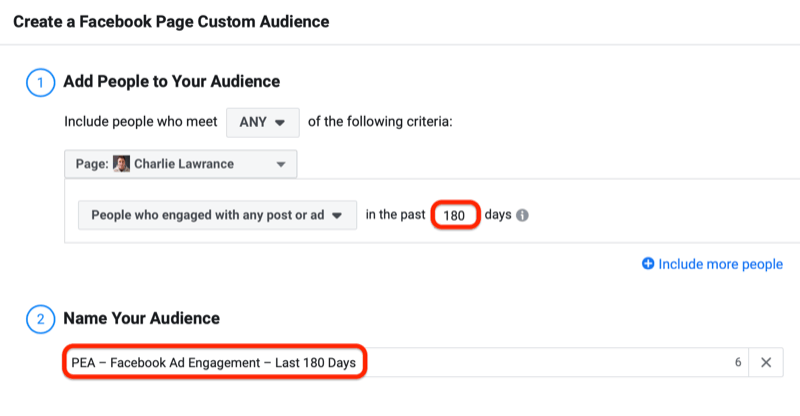
Repeat this process and create four additional page engagement audiences using the same engagement condition but with these audience durations: 90, 60, 30, and 14 days.
By creating multiple audiences, you can test to determine which is most effective. Each audience will be a different size and level of responsiveness based on the time people first engaged with your ad or posts.
Once you’ve created these audiences, repeat this process for the Instagram profile engagement custom audience. This time, select Instagram Business Profile as the source.
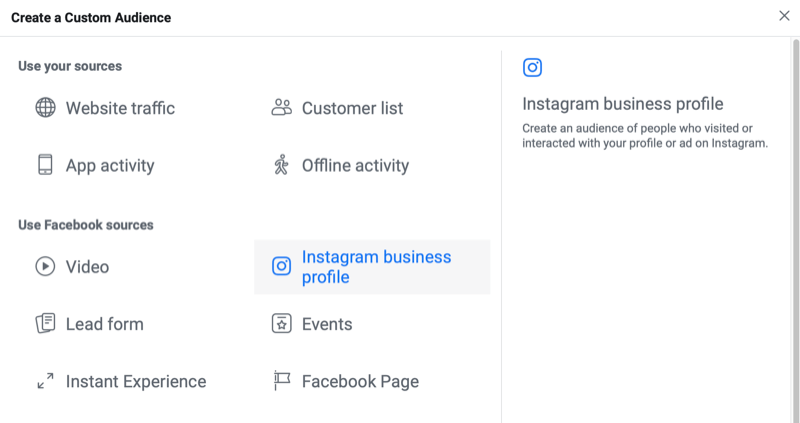
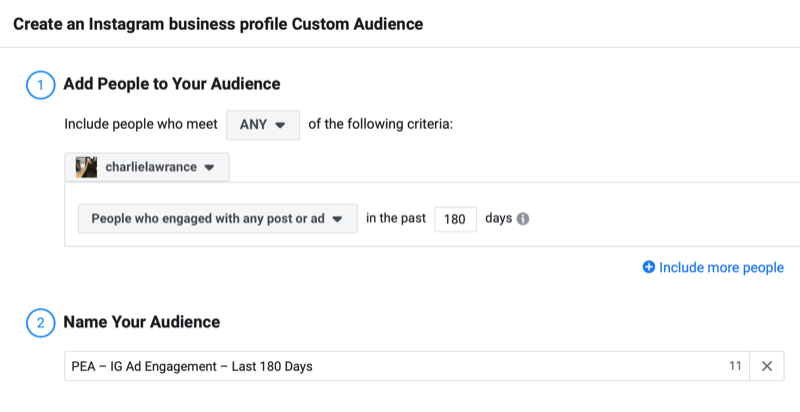
In the custom audience creation window, choose your Instagram business profile and select the ad/profile engagement condition. Then set your first audience duration to 180 days.
Name your audience using similar naming best practices (like “PEA – IG Ad Engagement – Last 180 Days”) and click Create.
Follow the same process to create the remaining Instagram profile engagement custom audiences with durations of 90, 60, 30, and 14 days.
#2: Create Your Engagement Remarketing Campaign in Facebook Ads Manager
With your custom audiences created, you’re ready to move on to creating the campaign, starting with the objective.
With larger engagement custom audiences, use the Conversions objective. For smaller ones, use the Traffic objective first and then switch objectives once you start increasing the number of conversions.
Pro Tip: If you have more than 50K people in your engagement audience, start with the Conversions objective, optimizing for the lowest action in your funnel such as Purchase. If you have fewer than 50K, start by using the Traffic objective and optimizing for landing page views.
In this example, we’ll use the Conversions objective. Click on Create in your Ads Manager dashboard. Then in the Quick Creation workflow, name your campaign and select Conversions from the Campaign Objective drop-down list.
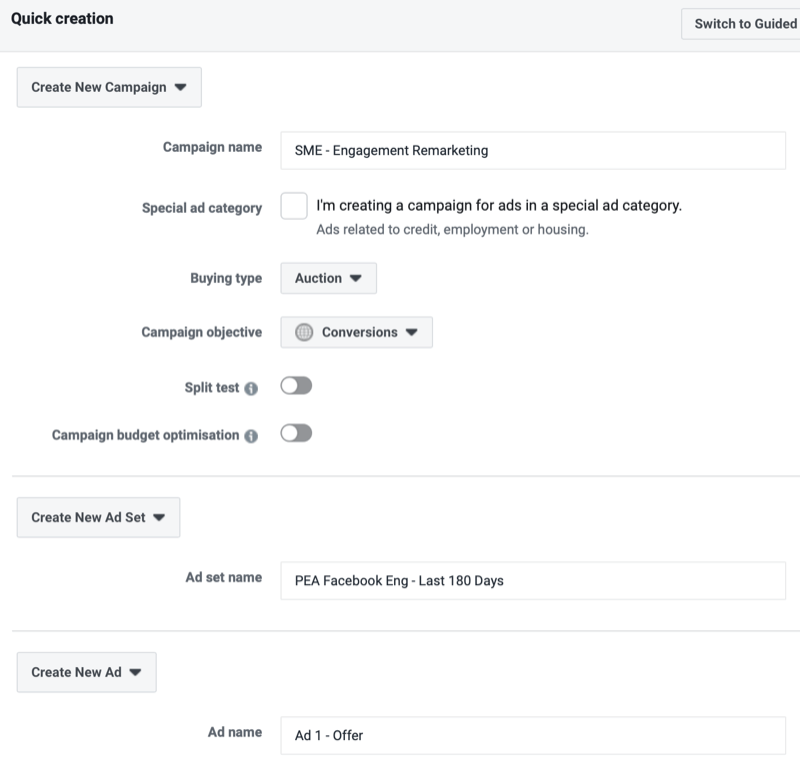
Finally, name your ad set and ad, and click on Save to Draft.
#3: Edit Your Ad Set
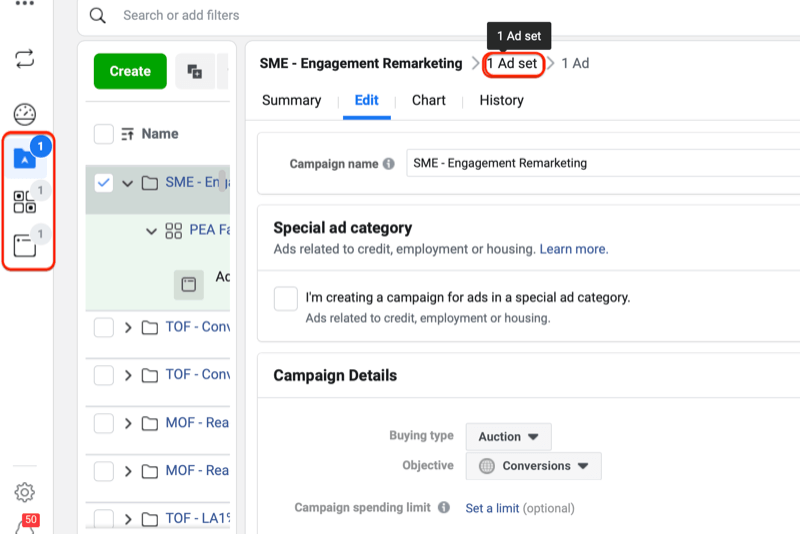
Once the edit window opens, navigate to the Ad Set level of your campaign by using either the top navigation in the edit window or the side navigation on the left side, as shown in the image below.
In the ad set, choose the conversion event you want to optimize for. You want to select the event that’s the lowest in your sales funnel (such as Purchase or Contact), depending on your business type.
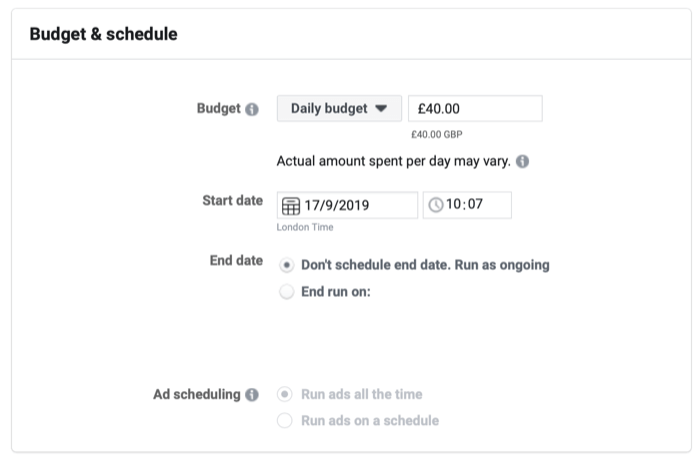
Scroll past Dynamic Creative and Offer to the Budget & Schedule section. Now set your budget. The most important thing to understand about ad budgets is that your budget dictates your audience reach. If you set it too high for your audience size, you’ll quickly encounter ad fatigue issues. If you set it too low, it’ll take longer to see results.
There’s no set way to determine the optimal budget. You need to gather data once the campaign is running and then make adjustments. If you’re unsure of what budget you should set, start with $15–$20 per day if your audience size is fewer than 50K. If it’s more than 50K, start higher by going with $20–$40 per day.
Get Expert Social Media Marketing Training!
Want to keep ahead of your competitors? Need to master a social platform? Discover how to improve your social media marketing at Social Media Marketing World 2020, brought to you by your friends at Social Media Examiner. You’ll rub shoulders with the biggest names and brands in social media, soak up countless tips and new strategies, and enjoy extensive networking opportunities . Don’t miss the industry’s largest conference. Get in early for big discounts.
Sale ends Tuesday, October 29th, 2019.
Move to the Audience section and in the Custom Audiences field, select the largest of your Facebook engagement custom audiences, the 180-day audience duration.
Unless you have very defined age or gender demographics of your customers, keep Age, Gender, Languages, and Detailed Targeting open. The reason for this is that these audiences have been narrowed already due to the engagement condition.
Next, set your placement. If you’re using the Conversions objective with the lowest event action in your funnel, like Purchases, start with Automatic Placements. The reason for this is Facebook will push your optimization to the most effective placement that has the highest-quality converters, typically feeds on Facebook and Instagram.
If, however, you’re starting with the Traffic objective with the landing page view optimization (because you have a smaller audience size), don’t use Automatic Placements. You’ll end up with low-cost, low-quality visitors as Facebook pushes your reach to the Audience Network.
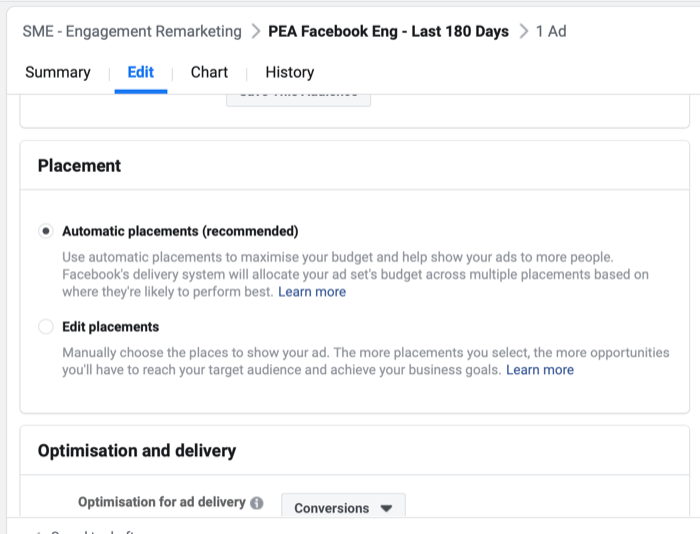
Continuing with the example, we’ll leave automatic placements selected. For a full breakdown of the placement options and the best time to use each one, click here.
Moving to the Optimization & Delivery section of your ad set, go with the default setting, optimizing for conversions with the 7-day click and 1-day view conversion window selected.
#4: Create an Ad for Your Product or Service Offer
The final step in setting up this campaign is to create your ad. To do this, navigate to the Ad level of your campaign by clicking on the Ad link at the top of the edit window or in the main navigation on the left side of the screen.

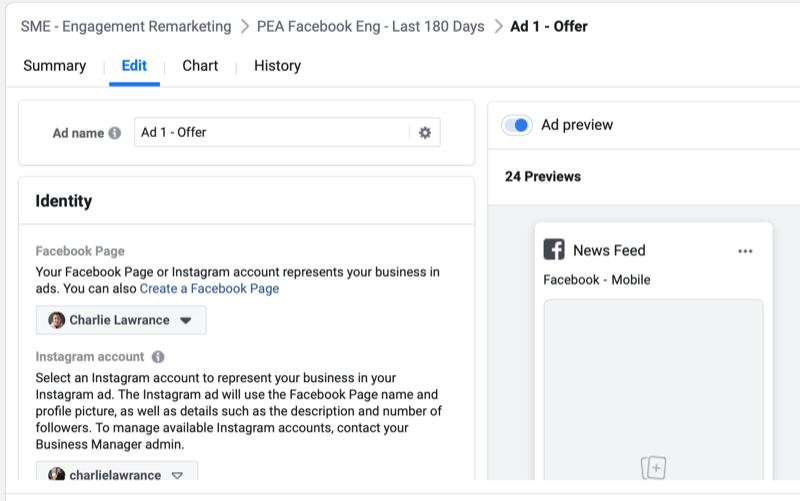
Once at the Ad level, you’ll see four sections: Identity, Create Ad, Languages, and Tracking.
In the Identity section, select your Facebook page and Instagram profile from the drop-down lists.
In the Create Ad section, start building your ad like you would with any other campaign. There’s no right or wrong ad format to use. The important thing is what you position in your ad.
At this stage of your ad funnel—where you’re targeting warm audiences that already know your business—you want to position a product or service offering.
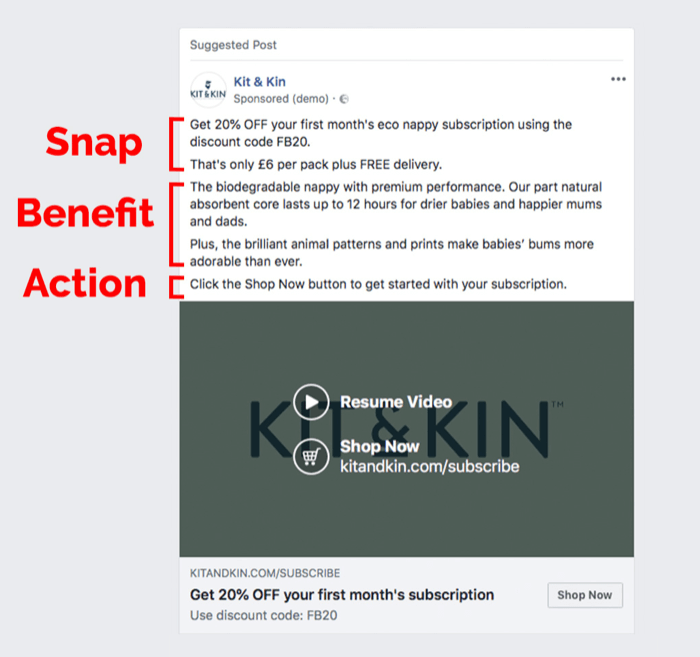
For the ad copy of your offer-based ad, use what I refer to as the SBA copy method, which is made up of the Snap, Benefit, and Action.
The Snap is the attention-grabbing first line of copy. What this first line says will depend on what product or service offer you present in this campaign. Suppose you’re an eCommerce company offering a product discount. In this case, the Snap would be the discount and the specific code to use at checkout, such as “Get 10% OFF when you spend over $50 using the discount code FB10.”
The Snap is then followed by the Benefit. Here you want to list core features of your product or service and the benefit of each. When it comes to effective copy, simply listing features isn’t enough; people want to know how those features benefit them.
The third part of the SBA copy method is the Action. Here you explicitly state the action your target audience needs to perform to take advantage of the offer you’ve positioned in your ad.
Keeping with the eCommerce example, the action would be a sentence at the end of your ad copy such as “Click the link below to shop now” or “Tap the Shop Now button to get started.”
Make sure you link to the specific product or service page, not your homepage. Also, use relevant creative, images, or videos of the product or service you’re offering.
Once you’ve created your ad, ensure that your Facebook pixel is enabled in the Tracking section and publish your campaign. Pay particular attention to tracking because often when you duplicate ads (which we’ll cover next), the Facebook pixel is turned off by default.
Let’s quickly recap. You’ve created your engagement custom audiences for Facebook and Instagram, chosen your campaign objective, set up ad set targeting for the largest Facebook engagement audience, built your offer ad, and then published the campaign.
#5: Create a New Ad Set in Your Campaign to Target Your Largest Instagram Engagement Audience
The next step to creating your campaign is to duplicate the ad set you just made live and change the custom audience to your largest Instagram engagement custom audience.
To do this, navigate to the Ad Set level of the campaign you just created. Select your ad set and click on the Duplicate button.
In the duplication window, leave Original Campaign selected and click on Duplicate. Facebook then creates an identical ad set and ad in draft form below your existing one.
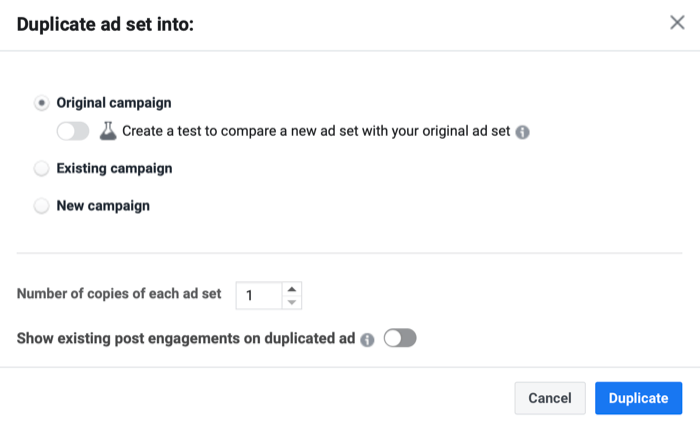
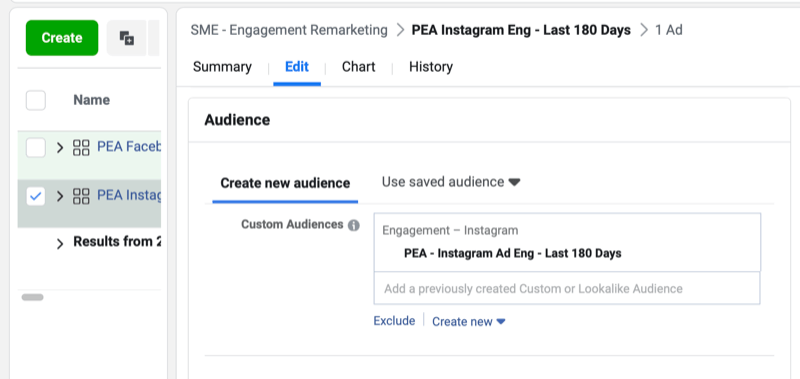
Edit your ad set and change the name to reflect that the audience will be for Instagram engagement.
In the Audiences section of your new draft ad set, delete the Facebook page engagement audience from the Custom Audience field and select your largest Instagram engagement audience, the 180-day duration audience (just as you did for the Facebook engagement ad set).
#6: Use the Post ID Method to Select the Original Ad
Now navigate to the Ad level of your new ad set and use the Post ID method to select the original version of the ad you published in the first Facebook engagement ad set.
When you first look at the ad in your new ad set, it will be identical to your original one. However, if you were to publish this ad, Facebook would treat it as a separate, new ad and give it a unique ad ID. In this case, you wouldn’t keep any social proof that’s building on the original ad.
Instead of using that new ad, click on Use Existing Post. Then click on Select Post.
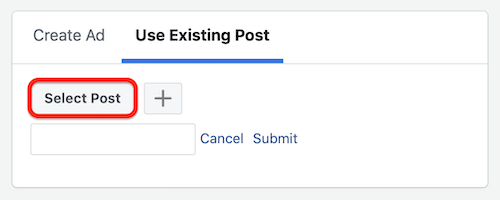
This will open the post matrix. Filter by Ad Posts and then select the original ad you created for this campaign.
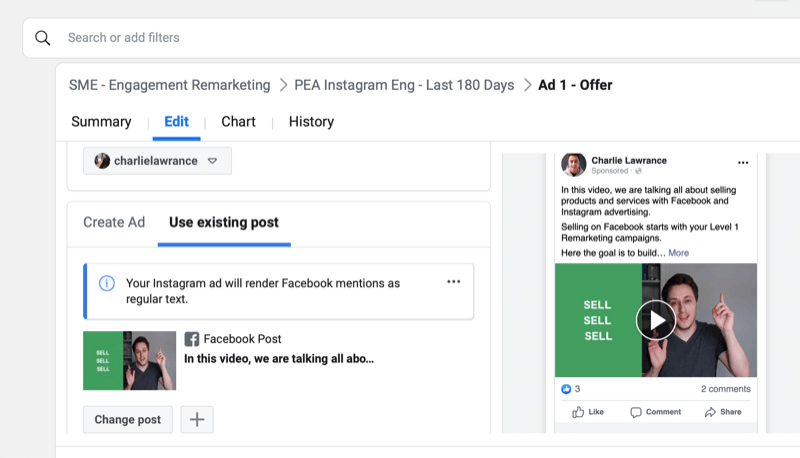
Finally, with the original ad being used in this new draft ad set targeting your Instagram engagement custom audience, check that your Facebook pixel is turned on in the Tracking section and click on Review and Publish to set it live.
Conclusion
Start driving new leads or sales for your business with engagement remarketing campaigns that target people who have already interacted with your business on Facebook and Instagram.
When implemented correctly, these campaigns can be a great source of high-quality traffic that not only converts at the time of ad click but also populates your website custom audiences. These people then go on to buy when shown your website remarketing campaigns.
What do you think? Will you create a campaign to target people who have engaged with your Facebook and Instagram content? Share your thoughts in the comments below.
