Are you working with a new Facebook pixel? Wondering whether to use a traffic objective campaign or a conversion objective campaign?
In this article, you’ll discover how to combine Facebook ads traffic and conversion campaigns to meet your goals.
Understanding Facebook Ads Traffic and Conversions Objectives
The objective you choose when you create your Facebook campaign has a huge impact on your results. It’s what defines the outcome of your campaigns and is therefore the most important element to get right.
The two most popular campaign objectives are Traffic and Conversions. On the surface, they look like they do the same thing but your results will vary widely depending on which one you use and what type of ads you’re running within the campaign. If you choose the wrong objective, you can waste your ad spend budget and see little in return.
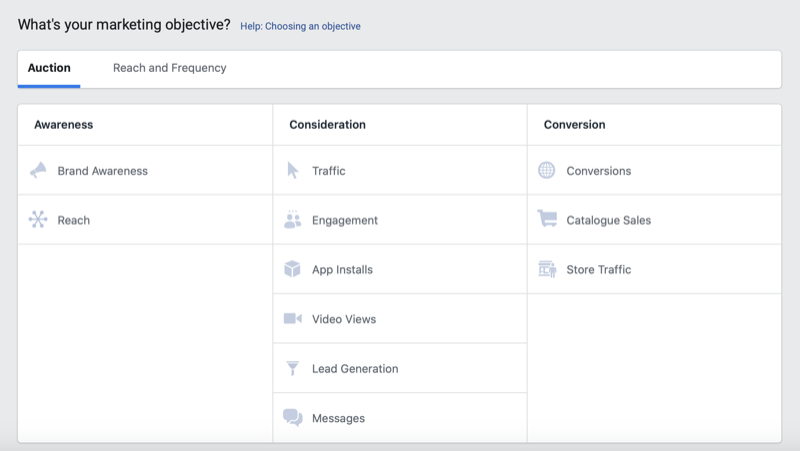
The main thing to understand about campaign objectives is that Facebook will focus on showing your ads to people who are most likely to take the action set by your objective.
- If you choose the Video Views objective, Facebook will show your ads to people who watch lots of videos on the platform.
- If you use the Traffic objective, they’ll show your ads to people who click on lots of ads.
- If you use the Conversions objective optimizing for standard events (such as purchases), they’ll show your ads to people most likely to take that event action (purchase of your product).
The algorithm works by segmenting people into buckets based on how likely they are to take your objective action, such as click on your ad using the traffic objective or trigger the conversion event you optimize for when using the conversions objective.
If you win the ad auction, Facebook will show your ads to people they’ve bucketed into those most likely to take that action. Then over time, as ad fatigue becomes an issue or when you scale your campaigns and there are no more people left in that bucket, Facebook will move on to the next group of people who are quite likely to take your campaign objective action. That’s when your cost per result will start to increase.
Because your objective is such an important element of your Facebook advertising, you need to choose the right one to get the best results. The traffic and conversions objectives are the two main options to drive people to your website so they can find out more about your business and then convert into customers or leads.
As I previously mentioned, on the surface, these two objectives do the same thing: drive people from Facebook or whatever placement you’ve selected in your campaign to your website. However, if you run the same ad to the exact same audience but use the two different objectives, you’ll get completely different results.
What Objective Should You Use: Traffic or Conversions?
Most of the time, you want to use the conversions objective, optimizing for the event action that matters most to your business.
If you’re an eCommerce business and sell a physical product or information via online courses, use the conversions objective optimizing for the purchase event action. But if you’re a service business, use the conversions objective optimizing for the lead event, which fires after someone makes an inquiry to your business.
Because Facebook’s algorithm is so good at identifying people likely to align with your objective conversion event action, you want to optimize for the event action that matters most to your business.
However, there’s one situation when the conversions objective is unlikely to work and you’ll need to use the traffic objective to get you started. This is when you have a brand-new pixel on your website and it hasn’t gathered enough data to optimize for a conversion event yet.
In this case, start by using the traffic objective. Then once you’ve gathered enough event actions from the people who have visited your website, you can switch your objective to conversions, optimizing for an event action within your sales funnel. I call this process objective stacking.
Let’s now look at how to implement objective stacking.
#1: Set Up the Facebook Pixel and Conversion Events
Before you use either of these objectives, you need to install the Facebook pixel and conversion events. Otherwise, you won’t be able to optimize your traffic campaign for landing page views or your conversion campaign for an event action.
The Facebook pixel is a piece of code that you install on your website that tracks the behavior of your visitors. You then add conversion actions called standard events to the base code on specific pages or buttons that reflect an important action to your business. Examples include the purchase event on a Place Order button click or a lead event on the thank-you page that loads after someone has submitted an inquiry.
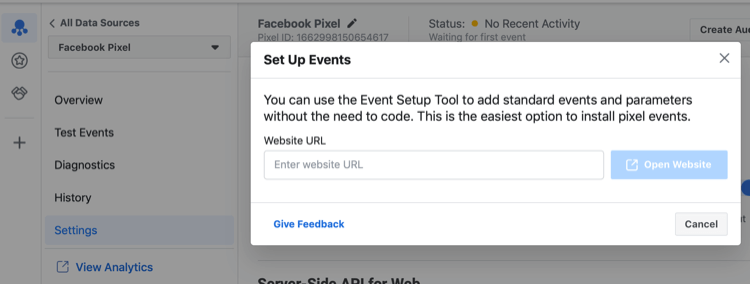
For a walkthrough of how to install the Facebook pixel and conversion events on your website, click here.
#2: Set Up a Facebook Ad Campaign With the Traffic Objective
Once you’ve installed the Facebook pixel, you can get down to creating your first traffic campaign.
Remember, use the traffic objective only if you have little to no pixel events recorded by your Facebook pixel.
First, we’re going to cover how to build a traffic campaign. Then we’ll look at when to switch it to the conversions objective and the different ways you can use the conversions objective.
In your Ads Manager dashboard, click on Create Campaign. You’ll then be presented with two options to create your campaign: Guided Creation or Quick Creation. In this example, we’re going to use the Quick Creation workflow.
Once you’ve selected that, name your campaign, ad set, and ad, and from the Campaign Objective drop-down list, select Traffic. Leave split testing and Campaign Budget Optimization turned off.
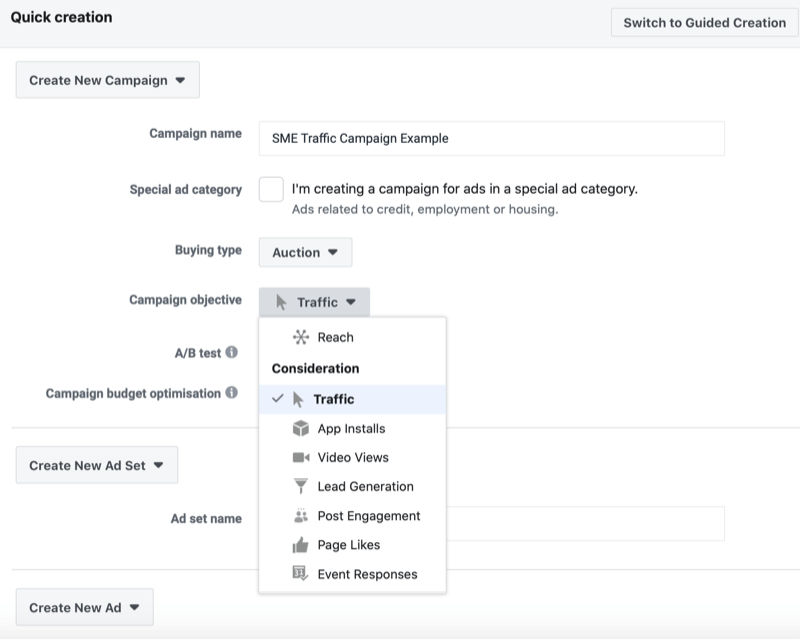
Once you’ve set your campaign-level settings (including choosing the traffic objective), move to the ad set level of your campaign. This type of campaign is best used in the middle of your sales funnel for engagement remarketing such as targeting video viewers or page engagers.
You can also use it for cold purchase/lead test campaigns, where you target cold audiences (such as interests or lookalike audiences) with product- or service-offer ads to drive people to your website. By doing this, you’re triggering the hyper-responsive people in your target audiences who are ready to buy now so you can generate leads or sales straight from these campaigns.
Regardless of which audience you target, cold or warm, you want to use the same positioning in your ads; that is, product or service ads that utilize some type of offer, which reduces the barrier to entry for your audience to buy.
For eCommerce or anyone selling something where customers pay online, discounts work extremely well. For local service businesses, complimentary consultations make a great offer. For software businesses, free trials are an excellent way to onboard potential customers.
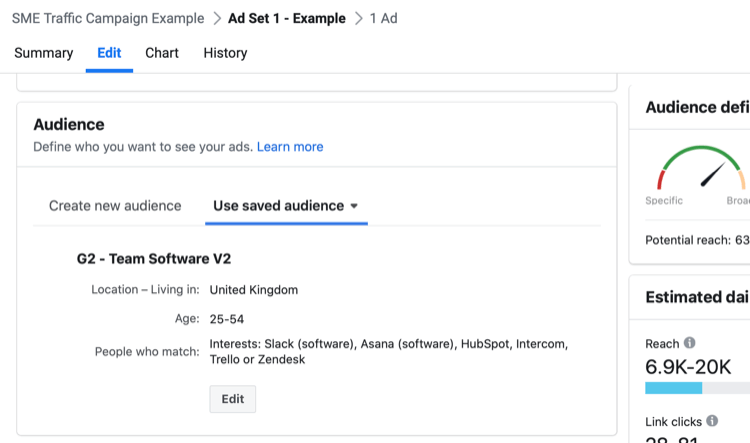
In your ad set, either create or select your target audience. If you’re using the campaign for engagement remarketing, choose your page engagers; if you’re using it for cold purchase/lead test campaigns, set it to your cold lookalike or interest audience.
Become the Social Media Marketing Rockstar for Your Business
Meet your secret team that makes you look like a social media genius and empowers you to embrace change! We’re a genuine community of marketers from your friends at Social Media Examiner. And we’re here to support you. Think of us as your career insurance policy. We keep you focused on what matters. We make sure you won’t be left behind as the changes keep coming. Join the Social Media Marketing Society. Get access to monthly online training, expert support, and a thriving community of marketers who will empower you to succeed.
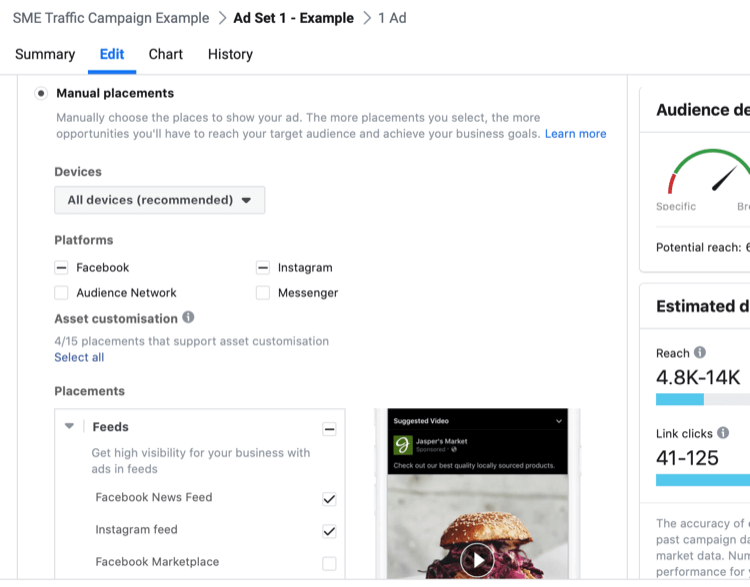
After you’ve selected your audiences, move on to the Placements section. When using the traffic objective, you want to edit your placements to select only the most valuable ones. In this case, you want Facebook and Instagram feeds, as well as Stories.
If you set automatic placements and let Facebook determine what placements to serve your ads, you’ll find that the majority of your reach will be on the Audience Network. It delivers super-cheap clicks, which on the surface sounds great, but the quality of the traffic is terrible and no one will convert.
The final part of creating the ad set in your traffic campaign is to set your optimization. By default, Link Clicks is enabled but you want to change that to optimize for Landing Page Views.
With Link Clicks, Facebook will show your ad to people who are likely to click on your ad, whereas with Landing Page Views, Facebook will look for people who are likely to click on your ad and stay to load the page, which will then trigger the landing page view event on your Facebook pixel.
Pro Tip: When running a campaign with either the traffic or conversions objective, always monitor your link click to landing page view ratio. A large discrepancy in the number of landing page views to link clicks means people aren’t staying around to load the page, and most often, it’s because you have a slow page-load speed.
With your ad set complete, move on to the ad level of your traffic campaign. Here you want to create product or service ads that position an offer to encourage your audience to convert into customers or clients.
To illustrate, this product ad uses a discount to promote gift boxes:

Once your traffic campaign is up and running and you’re generating landing page views, monitor the conversion events you’ve installed on your website to see how many are being triggered by the new traffic on your website.
To see how many event actions are being recorded, navigate to Events Manager. In the main pixel dashboard below the graph, you’ll see all of the events being tracked and how many actions have been recorded. Use the date picker in the top-right corner to select a relevant date range since you launched your traffic campaign.
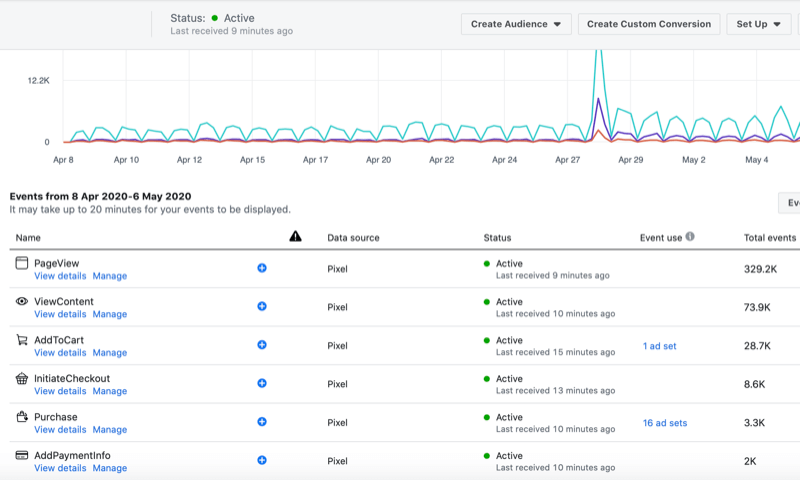
After you’ve built up enough event fires—typically more than 100 but ideally closer to 500—you want to objective stack and switch to the conversions objective, optimizing for the standard event that matters most to your business.
#3: Choose How to Retarget Your Traffic Objective Leads
There are a number of ways to use the conversions objective. You can use it for remarketing to warm audiences of page engagers or video viewers and for cold purchase/lead test campaigns.
You can also use the conversions objective to remarket to hot audiences of website traffic and drive new leads or sales by targeting ads to people who have visited your website but haven’t converted into new customers or clients.
Here are seven ways to target your website visitors by building website custom audiences:
- Target everyone who visited your website.
- Target people who visited a specific product page but didn’t purchase.
- Target people who viewed your lead magnet landing page but didn’t opt in.
- Target people who viewed your contact page.
- Target people who started the buying process but didn’t complete it.
- Target people who previously purchased from you.
- Target people who read your blog.
You can then use these audiences in a conversion campaign, optimizing for the event that matters most to your business, and run reminder, testimonial, or Messenger ads to successfully re-engage those audiences.
#4: Convert Your Successful Traffic Objective Campaign to a Conversions Objective Campaign
Once you’ve decided how to retarget your traffic objective leads, you’re ready to convert your traffic campaign into a conversion campaign.
The first thing you need to do is duplicate your traffic campaign. To do this, select your traffic campaign and click on the Duplicate button.

Then make the following changes to the campaign:
Change the campaign objective to conversions. You’ll see a message telling you that some changes will happen; click OK. In your ad set, choose the standard event action that you want to optimize for. What you select will depend on the number of pixel fires for each of your event actions.
For instance, if you’ve generated enough purchase event actions, you can optimize for purchases. If not, you may need to move higher up your funnel and optimize for add to cart actions or initiate checkout actions.
Switch from Manual Placements to Automatic Placements. Now that you’re optimizing for conversions and not landing page views, Facebook will prioritize the most effective placements for conversions, which are feeds on Facebook and Instagram. You don’t have to worry about junk traffic from the Audience Network.
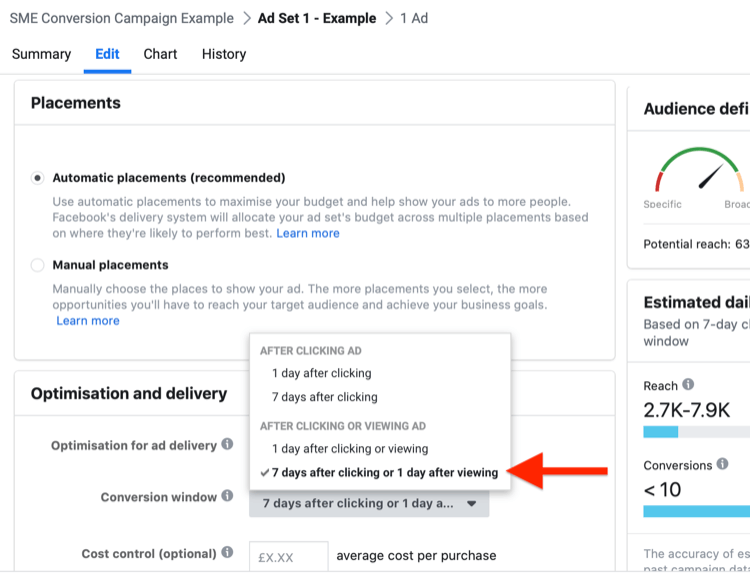
Set your conversion window to 7 Days After Clicking or 1 Day After Viewing. This setting will allow Facebook to gather more data to optimize your campaign compared to the 1-day click conversion window.
Use the Post ID method to select the existing ad you used in the traffic campaign, which allows you to keep all of the social proof from that ad. At the ad level of your campaign, find the post ID for your traffic ad and then select Use Existing Post and paste it in the ID field. For a full walkthrough of how to do this, click here.
Once you’ve completed these changes, set your new conversion campaign live and turn off your original traffic campaign.
Repeat this process with conversion events moving lower down your funnel until you have enough pixel data to optimize for the most valuable event action, either leads for service businesses or purchases for businesses that sell online.
Conclusion
If you’re new to Facebook advertising and don’t have a lot of recorded event actions from your Facebook pixel, you want to start by using the traffic objective optimizing for landing page views to build up the number of event actions.
Once you have enough event actions, you can objective stack and switch the campaign to the conversions objective by duplicating the traffic campaign and using the same ad via the post ID method.
If you already have enough event actions, you can go straight in and start using the conversions objective, optimizing for the event action that matters most to your business. It can be used throughout your sales funnel from cold purchase/lead test campaigns to engagement remarketing and website remarketing campaigns.
